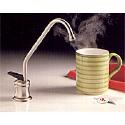
 An instant hot water dispenser is a convenient kitchen appliance. Instead of using the regular kitchen faucet and waiting for the water to get hot, an instant hot water dispenser delivers hot water instantly. Very hot water. Although you can set the dispenser to deliver hot water like a traditional kitchen faucet, this dispenser delivers very hot water. In fact, most come pre-set at 200 degrees. You can use them for instant soup, cofee or tea.
Sometimes though, they don't work correctly. However, there are several things you can do before you start thinking about replacing the unit.
1. Press The Reset Button
Some units have a reset button that restarts the unit. If it overheats for example, the heater will stop. Depressing the reset button will restart the unit.
2. No Power At The Outlet
If the outlet that the unit is plugged into is not providing power, the unit will not heat. You may need to reset a circuit breaker or GFCI to restore power.
3. Make Sure The Outlet Isn't Switched
Some outlets are "half-hot" or switched outlets under the kitchen sink. The top half of the outlet is for the garbage disposal to turn it on or off. If the hot water dispenser is plugged into this outlet and the switch is "off", it will not receive power to operate.
4. Adjust The Thermostat
If your hot water dispenser is spitting out steam and water, it is set too high. Conversely, if the water is not hot enough, you need to adjust the thermostat to your desired temperature.
5. Check The Water Supply
If your unit won't deliver a good stream of water, or just drips when you depress the faucet, check to see that the lines underneath the unit are not kinked and that the valves supplying the water are fully open. Also you might check to see that there is no debris in the spout of the dispenser by unscrewing the end piece. Finally, if the water pressure is low (typically less than 30 psi), the unit will not operate.
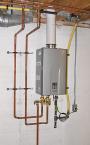 A customer called the other day asking about a problem he was having with his tankless water heater. He said it was just installed and he bought it new from a home center. His complaint was that when he ran a faucet everything was fine and he got hot water, but when he ran a shower or bathtub...no hot water!
I started asking questions and he sheepishly told me he paid someone he just met to install it. Apparently, he met the guy in the parking lot of the home center and he was believable enough to get the job. The reason he was calling me was that he couldn't get ahold of the guy he met in the parking lot. Hello? Are you serious? This customer paid $1,500.00 for a new tankless water heater and let some shark trolling the parking lot install it on the cheap. This guy made a bad decision and he knew it.
After speaking to the customer, it was pretty obvious the installer didn't know what he was doing. This was a gas tankless water heater, and although they will save energy on your monthly gas bill, they demand a lot of energy when they are actively heating water. Most of our homes have a ½" gas line which is fine for a typical tank-style water heater. For a tankless, the gas line needs to be upgraded to a ¾" gas line. That was one of the problems with this installation. The installer (and I use the term loosely), simply added a ¾" adapter onto the existing ½" gas line. Big mistake. Although the guy was able to connect the gas line to the water heater, it still was a ½" gas supply. A new ¾" line needed to be run to properly supply the water heater.
With a tankless, there are typically venting considerations also, due to the venting being much closer to the burner, and consequently burning much hotter. The point is, this probably isn't a job for someone inexperienced in installing a tankless water heater.
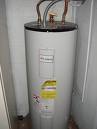
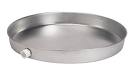 You've probably been through it. The water heater leaks and ruins the drywall it is surrounded by. Water saturated drywall may sit there for weeks or months until you notice the leak at your water heater. And to think the damage could have been prevented...with a drip pan.
A water heater drip pan catches the water that leaks and diverts it to wherever you pipe the drain. You'll have to figure out whether to repair or replace your water heater, but the pan will at least save your drywall. Incidentally, the best time to install a drip pan is when you are replacing your water heater. Installing a drip pan under an existing water heater is about as much work as installing one when replacing the water heater anyway, since you have to drain and move it.
Many people ask if they can install a drip pan without draining the water heater. A gallon of water weighs just over 8 pounds, so if you have a 40 gallon tank, you are looking at 320 pounds of water plus the weight of the tank. Don't even think about it. You must drain the water heater!
Once you turn off the water heater and drain it, it is safer to disconnect the flexible copper supply lines and remove it off of the stand rather than trying to lift it up and sliding the pan underneath.. Once you have the stand clear, you can set the pan down and place the water heater inside the pan (the pan is approximately 3 inches tall). With the pan down, you can run the drain line to the exterior or wherever is appropriate.
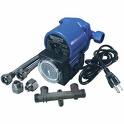 I hate waiting...for food, for stoplights, and hot water. If you live in a house where the master shower is at the far end of the house and the water heater is at the other end, you're going to do some waiting too. Save yourself a little agony and think about installing a water recirculation pump.
A water recirculation pump creates a loop in your house, where you ordinarily wouldn't have a loop. When a house is built to accommodate a hot water recirculation system, a loop is built into the house and then the plumbing fixtures are branched off of this loop. However, with a retrofit type system, we have to create a loop using a cold water line.
The pump can be mounted under the sink farthest away from the water heater or at the water heater itself. When the retrofit pump unit is installed at the water heater, a pipe is installed at the sink farthest away from the water heater that essentially connects the hot and cold water lines at that fixture.
The idea behind creating a hot water circulation loop is much better than cutting up walls and re-piping the house right? Well, you will have to tolerate losing a cold water line though. It's best to install the pump (or the pipe, depending on which style you have) under a bathroom sink that has two sinks in the bathroom. This is because you will lose the cold water in whichever sink you decide to install this. When I say "lose", I don't mean it will be totally gone, but remember how long you had to wait to get hot water? Well you will have to wait about that long to get cold after you install the pump system. You will have to clear out all the hot water so that the cold can make it's way to the faucet. That's why I suggest installing it under a double vanity sink, if you want cold water immediately, just take 2 steps and there it is. Once you've decided to save thousands of gallons of water annually, read this article on how to install a water recirculating pump.
 A customer just called and asked about why her water heater was making a thumping noise. Specifically, she said the sound was similar to the noise that her clothes dryer makes when she has a pair of tennis shoes rolling around inside.
I asked her when the last time she drained her water heater, and she didn't know. The water heater was 5 years old. It sounded to me like it had never been touched since it was installed. What happens is that you get a layer of sediment at the base of the water heater. If your water heater is gas, this sediment effectively creates a barrier and slows the transfer of heat from the burner to the water, making the unit burn longer to heat your water (and also costing you more money). This sediment makes your water heater inefficient and causes it to make a gurgle or rumbling sound. If your water heater is electric, the sediment builds up on the heating elements and eventually flakes off.
All of this sediment collects on the bottom of the water heater's tank and effectively displaces the amount of water available turning a 40 gallon tank, for example, into a 38 gallon tank.
This customer's water heater was gas and the analogy I used was for her to imagine cooking spaghetti sauce. Imagine a delicious thick sauce on the stove. As the heat builds up from the burner below, the sauce is so thick and heavy it can't boil and instead develops a large bubble that finally burps out. This is what happens at the bottom of your gas water heater, but instead of sauce its sediment. Here is some information on flushing your water heater.
 While repairing a water heater, I noticed that although the water heater was fairly new, it did not have earthquake straps on it. I remarked to the homeowner about this and he said he had replaced the old water heater with a new one. Since the old one didn't have straps, he didn't install them on his new water heater.
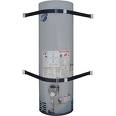
Water heater installations have changed over the years. One of the changes is the requirement of installing earthquake straps on water heaters, at least for Las Vegas water heaters. This job is easy but necessary. A 40 gallon water heater filled with water weighs over 400 pounds. If it is powered by natural gas, it is required to be elevated off of the floor. If an earthquake occurs, or a car bumps it, it could fall over and potentially cause serious damage or injury, not to mention filling the garage with natural gas. This can all be eliminated by installing earthquake straps.
The water heater should be strapped in 2 places. One strap should go around the tank in the top 1/3 of the tank, and the other strap needs to be secured in the lower 1/3 of the tank between two and four inches above the controls. You must install these straps into wall studs for holding power. The straps will come with lag bolts to secure them into the lumber. Use a stud finder to locate the studs and install the bolts into them.
Many water heaters are located in the corner of a room or garage, so shoot for the corner where there will be plenty of lumber.
 We went to a customer's house yesterday because he had water coming from a pipe by his front door. He was calling it a plumbing leak, but if is coming from a pipe that is intentionally placed there, it is probably mechanical in nature. There are a few situations where you would see this. One is from the air conditioning condensation pan, and the other is from the temperature and pressure relief valve (TPR) of your water heater.
You typically would only see the a/c condensation drain line dripping if the a/c is running, and it is fairly humid outside.
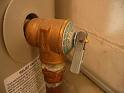
I put my hand under the pipe and the water was hot, and so it narrowed it down to the TPR valve of the water heater. The water heater happened to be on the exact opposite side of the wall, so it was pretty obvious. The TPR valve opens if the pressure in the tank exceeds 150 psi or if the temperature in the tank is higher than 210 degrees.
Sometimes the TPR valve is bad and it needs to be replaced and at other times it is operating properly and doing its job to prevent an explosion. You can go inside the house and turn on a hot water faucet this will allow hot water to drain out of the tank and cold incoming water to cool the tank down. I would also check the thermostat's setting. You probably have room to turn it down, save some energy, and still maintain your comfort.
Some people will test the TPR valve by flipping up the tab on the end, and this is a good idea. However, many times the TPR won't stop leaking after toggling it. You can try a gentle tap with a hammer to see if this reseats it. If not, you may have to replace the TPR valve.
It always seems that water heaters time their demise just perfectly-Christmas Eve, weddings and shower time.
There are several possible causes. So, check the heating elements, the thermostats and the dip tube. An electric water heater uses two heating elements to heat the water: one near the top of the tank and one near the bottom.
The bottom element does the bulk of the heating work, while the top plays backup during periods of high demand. Each element has a thermostat that you can sometimes adjust, but since the heater was working fine and only recently started acting up, I doubt that adjusting a thermostat will fix it. (You may have to replace one, however).
A broken dip tube may also be the culprit, as the device is responsible for forcing the incoming cold water down to the tank's bottom to get heated. The hot water then rises to the top and out through your showerhead. If the tube is broken, the cold and hot water mix at the top of the tank and you get hot water-initially, until it turns lukewarm.
The thermostats are located on the side of your tank under metal panels. Turn off the power to the water heater at the main service panel and remove the covers that hide the elements. The first thing to check is if the reset button has tripped on either element. To cure this, just push the red button and it should resume heating normally. Realize though, that there may be an underlying problem that made the button trip.
If you have adjustable thermostats, you can use a screwdriver to change the setting. Turn the screwdriver clockwise for hotter and counterclockwise for a cooler heat setting. Like I said earlier, I doubt this will fix your problem.
Start with the upper thermostat and test it for continuity using a multimeter. If it is faulty, remove the wires and unscrew it from the side of the tank. Install a new thermostat and adjust the settings according to the manufacturer's instructions. You can test and replace the lower thermostat in the same manner.
Next, check the heating elements. Again, use the multimeter and test each element. Disconnect one element wire, and then touch one probe of the multimeter to an element mounting bolt, and touch each of the terminal screws, one at a time. If you get a bad reading, you need to replace the element.
To replace the element, drain the tank. Attach a hose to the bottom of the tank at the hose connection and open the valve. You will have to allow air into the system to get the water flowing, so open the nearest hot water faucet after you close the cold water supply valve at the top of the tank.
Once the tank is drained, remove the wires from the heating element and then unscrew the mounting bolts that hold the element in place. Remove the element and replace it with a new one of the same rating. You may find that once you have the element out, it may be covered with caked-on sediment. This could also be the culprit.
After you reattach the mounting bolts and screws, you will have to fill the tank back up with water and turn the power back on, as well as adjust the thermostats. With any luck, you will be enjoying hot showers in no time.
Before you sink money into your water heater, you might consider its age and how many more useful years it has left. If it is 6 years old, is it worth sinking $100 and a few hours of your time into it? Maybe. Most water heaters are out of warranty by this age and it could last a few more months or a few more years. You might consider replacing your water heater.
When you are done reading this, you need to check your water heater. Your water heater has a safety device called a Temperature & Relief Valve (T&P Valve). This valve is connected to a drain pipe to take hot water and pressure out of the tank. It is a vital safety device that opens if the temperature of the tank exceeds 210 degrees or if the pressure in the tank exceeds 150 psi. The drain line runs from the T&P valve downward to the exterior of the building, a floor drain, etc.
This drain line is critical for your safety. It carries away potentially scalding hot water, or highly pressurized hot water, or both, to allow cold incoming water into the tank which should prevent boiling. The diameter of this discharge line cannot be less than the T&P valve's discharge outlet and has to be made of heat-resistant material (no garden hose, PVC, etc.) The most common violation I see is that the drain line is "trapped".
This drain line must be gravity fed, i.e. it can't have any uphill rise in the pipe. This would "trap" water in the pipe and act as an obstruction for the hot, pressurized water. This water could also freeze which would be the equivalent of not having a T&P valve installed at all. A T&P valve doesn't open often, but when it does, the water and pressure inside the tank needs to make a quick exit, or the tank could explode.
In many cases, fixing the drain line is easy. Many drain lines are connected with a flexible copper line and you can bend them in such a way as to remove any uphill rise. In some cases though, you may have to replace or re-route the drain line altogether.
 A water heater that starts out with hot water and gradually cools to luke-warm water can have many possible causes, from high usage to an undersized tank to a plethora of other water heater maladies. One of the possibilities that most homeowners don't consider is a damaged dip tube.
A dip tube is attached to the cold water inlet and forces the incoming cold water down to the bottom of the tank to get hot. Hot water is more buoyant than cold water and therefore it rises to the top of the tank and exits to your shower. If the dip tube is broken or cracked, the cold incoming water can't get to the bottom of the tank to get hot, and instead mixes with the warm water at the top of the tank on its way to your shower. You would typically start with a nice hot shower and, fairly quickly, the water would get cooler.
The fix here is to replace the dip tube. You will need to remove the cold water inlet nipple and pull out whatever is left of the dip tube and insert a new one.
As usual, you need to consider the age of your water heater. It may not be worth it to spend the money to repair your old one rather than replacing it with a new water heater. I've seen many instances where a homeowner spent a couple hundred dollars to repair an old water heater, and then the tank leaks the following month. You may want to bite the bullet and apply the money towards a new one.